Wednesday, March 11, 2015

Thyme to see what all the BUZZZZZZZZZZZZZZ is about

Today I am going to show you how to make some

BUMBLE BEES!


PAINTS
DecoArt Americana Acrylic paints
Lamp Black, Antique Gold

SUPPLIES
EGG shape wooden pieces and small wooden balls that have a FLAT side
( these can usually be found in craft stores)
glue gun, rusty wire, old window screen

LET'S GET STARTED!

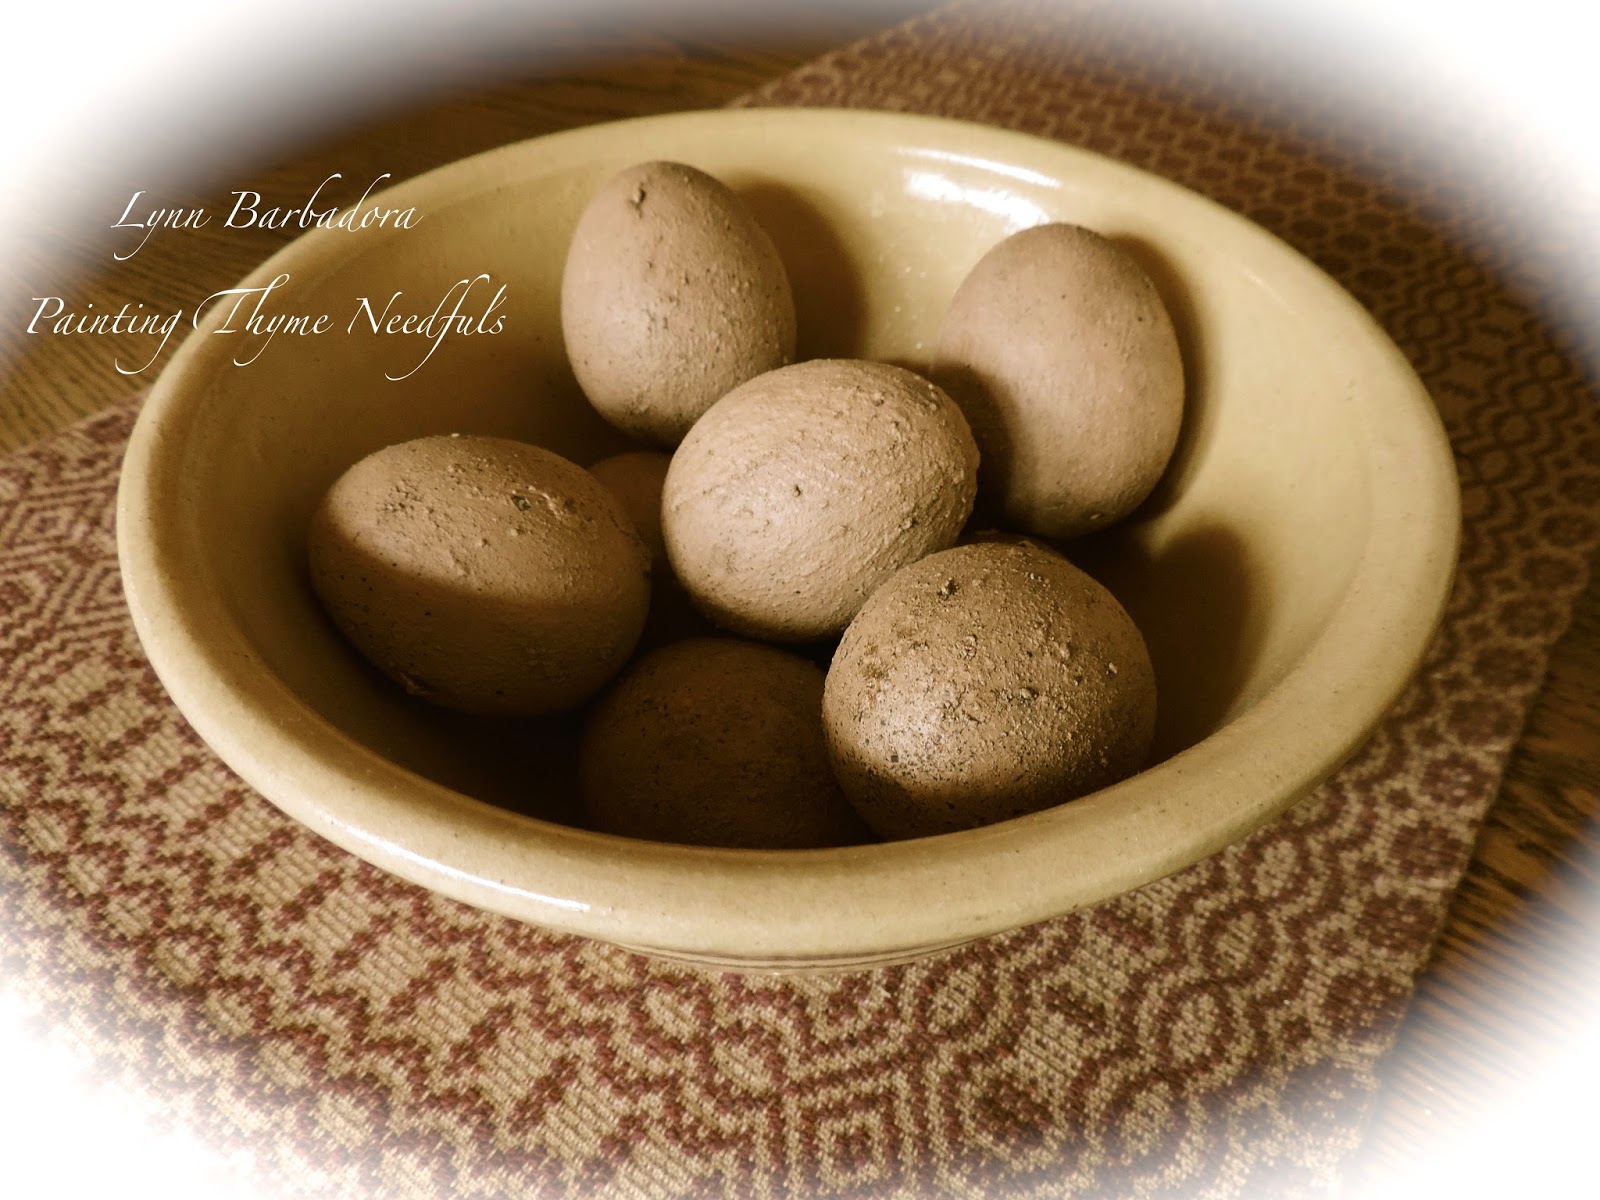
I glued egg shaped wood pieces to
the small wooden balls.
The wooden balls SHOULD have one flat side
I cut a slit on one side of the egg
I then painted them using
Lamp Black


When dry I  added some stripes using
Antique Gold

Hmmmmmmmmmm
Do you know what this
is going to
BEEEEEEEEEE
yet?????


I then cut some wings
out of an old screen


I folded it in half


I inserted the wings into the slit I had made


I cut 2 small pieces of black wire
I curled the ends
I drilled two tiny holes in the head
and
added the antennae


I took some heavy rusted wire
and wrapped it around a pencil


I drilled another small hole
on bottom side of the egg


OH...............its a BUMBLEBEE!

I made some vanilla stained tags
I wrote
BEESKEP
on them


I designed, cut out and painted this BEESKEP to attach my bee to!


I also painted this sign


So there you have it......
all thats
BUZZZZZZZZZZZZING
here!


Happy Painting!
Lynn


"Each day is a new canvas to paint upon.
Make sure your picture is full of life and happiness,
and
at the end of the day you don't look at it
and
wish you had painted something different."
 ~Author Unknown

Tuesday, March 10, 2015

Thyme to show you how to make some Primitive Easter Eggs!


Today
I would like to show you how to make some 
PRIMITIVE EASTER EGGS


Lets gather some supplies and paint!
Supplies
colored plastic Easter eggs, cinnamon, thin wire or twine, homespun, old paint brush, drying rack or egg carton, glue gun, drill , disposable rubber gloves, disposable container for  mixing paint
Paint
grey metal paint primer, DecoArt Americana Khaki Tan paint
Lets get started!

The eggs that I found had holes drilled in the top.
If you want to hang your eggs, now would be a good time to drill your holes
IF
your eggs do not have holes in them!
If your eggs come apart in the center use your glue gun
and
a dab of glue to glue them shut!


Spray a couple of LIGHT coats of gray metal primer to your eggs!
Let your eggs dry well between coats.
I use an old egg carton to stand my eggs in to dry.
I spray the tops first , when dry I rotate them and spray the bottoms.


Let your eggs dry well!
Pour some Khaki Tan paint in a disposable bowl
(depending on how many eggs you are painting you may need several bottles of paint)
Sprinkle CINNAMON into your paint a little at a time.
Mix well. 
The paint will be THICK!
( this is what gives your paint texture and adds flecks of color)
BEFORE PAINTING
If you are going to hang your eggs
cut a small piece of wire or twine
and
stick into the holes on top of your egg.
Secure with a dab of glue 
You are now ready to PAINT your eggs!
Use an old scruffy brush and mush the paint on your eggs.
The thicker the better!
You don't need to try to get these SMOOTH!
They are PRIM Easter eggs!
Let your eggs dry well!


Cut strips of homespun


You can tie your homespun at the top of your egg


I display my eggs on my primitive tree.
I made this tree using an old antique sugar tin I found
at a thrift shop!


 I display my
 " primitive tree" 
on an old dough box in my dining room
I make various seasonal decorations to hang on it


I saved some of my eggs to display in my yellow ware bowls


I hope you have enjoyed this tutorial to make primitive 
EASTER Eggs!
Deco Art provided me with the paints to complete this project as part of their
Helping Artist Program
and
Blogger Out Reach Programs
Thank you Deco Art for all your wonderful products!
You can find my 
Deco Art profile

Happy Painting!
Lynn


"Each day is a new canvas to paint upon.
Make sure your picture is full of life and happiness,
and
at the end of the day you don't look at it
and
wish you had painted something different."
 ~Author Unknown

Wednesday, February 4, 2015

Thyme for some Peppermint Stix

I love going junking
 so I can
find pieces to add
 to
 my stash to paint


I found this wood tray  at a thrift shop a long time ago.
I finally decided on a design to paint on it!

Today I would like to show you a design 
by


called

PEPPERMINT STIX

that I have painted


My palette for this project


Lamp Black, Snow White, Tomatoe Red, Cranberry Wine, Tangelo Orange, Leaf Green, Avocado, Olive Green, Black Green, Warm White, Cadium Red, Rockwood Red

Speciality Paint


Finish


I use the matte finish to complete my project . 
It also comes in Satin and Gloss.


Let's Paint!!


I mixed equal parts of Americana Gesso with Lamp Black for my initial basecoat.


I applied with a 2" foam roller. 
When dry I applied a second coat with Lamp Black again using a 2" foam roller.


I used WHITE graphite paper to transfer my design to the tray.


I began by first painting in the evergreens in the background of the design


I used painters tape to tape off the peppermint stix one at a time to paint.


I used a small wedge cosmetic sponge to "paint" the peppermint stix using Snow White.


Now for the FUN part! 
Lets add some STRIPES!


 STRIPES 
require
 a 
STEADY HAND and GOOD EYE !!!
It's one thing that is getting harder and harder for me to do!


I've added shading to my peppermint stix's.
I am now adding the holly and berries on top of design


I decided to add some
 peppermints and holly vine 
to the upper and lower corners 
of
 the tray


I used a CIRCLE template 
and 
a wedge cosmetic sponge with Snow White to base in the
 peppermints
in the corners of my design


I added 2 coats of

GLAMOUR DUST Ice Crystal
to all my peppermints
to make them
SPARKLE !

I painted the rim of the tray with

Tomatoe Red
for
contrast


I finished my piece with several coats
of
Americana Dura Clear Matte Varnish


I hope you have enjoyed watching me paint

Peppermint Stix


This pattern can be found 
at
Lonna's Strokes of Art


Deco Art provided me with the paints to complete this project as part of their
Helping Artist 
and 
Blogger Outreach Programs

Thank you Deco Art for the opportunity to use your products!

You can read my 
Deco Art Blogger Profile


Happy Painting!
Lynn


"Each day is a new canvas to paint upon.
Make sure your picture is full of life and happiness,
and
at the end of the day you don't look at it
and
wish you had painted something different."
 ~Author Unknown


Sunday, January 25, 2015

It's THYME for some WINTER TIME MAGIC

Living 
in 
New England 
I have to say that we have been very 
LUCKY 
so far this winter 
because we have not seen much of the 
WHITE stuff 
yet!
Listening to the weather forecast
 for
the next few days there is a possibility 
that 
could change!
We could be in for some
WINTER TIME MAGIC!

Even 
IF 
the weathermen 
are wrong 
I have decided to paint some winter MAGIC!


I love to paint on ice skates!
They can usually be found at yard sales thrift shops or even in your own basement!
I use grey metal primer to prep skates 
after cleaning them well
 and 
taping off the heel and runner.

I used a design from 
Viki Sherman's 
Kindred Hearts Book
called
WINTER TIME MAGIC


My Pallette
Burnt Umber, Soft Black, Mississippi Mud, Titanium White, Paynes Grey, Black Green, Evergreen, Antique White, Burnt Orange, Light French Blue, Black Plum, Avacado, Lamp Black, Light Buttermilk, Heritage Brick, Deep Midnight Blue, Cherry Red


After the primer had dried well I basecoated my skates with 2 good coats 
of
Mississippi Mud


Ice Skates 
are 
a fun surface to paint on!
Just paint right over the existing stitching.


After painting my design I painted the eyelets Lamp Black for contrast. 
I added some
GLITTER SNOW
along the sole of the skate.

I varnished my skate with 2 coats of

When dry 
I lightly sprayed my skate with a spray glue for glitter
I then sprinkled my skate 
with
DIAMOND DUST 
to
 make it sparkle!
Add some 
DIAMOND DUST
 to the blade also 
so it will look like there is
 ICE 
on the blade.


I like to fill my skates with a mix of 
"winter thyme" greenery
I secure a piece of floral styrofoam inside the skate with hot glue
I make some "snowballs" using various size styrofoam balls.
Spray the styrofoam balls
 with 
spray glue for glitter
 then sprinkle them 
with 
DIAMOND DUST
I use wooden skewers to make my snowballs into picks to stick in my arrangement.
Use green floral tape to cover the wooden stick


I tore strips of homespun to use as laces 
and 
added a large bell


I attached a small tag that 
said
BELIEVE


Attach a piece of wire in the back for hanging


Or
if you prefer to use your skate as a table centerpiece
cut a block of wood, paint it , cut a groove down the center of the wood
 and 
insert the blade of your skate!


DecoArt provided me with the paints to complete this project as part of their
Helping Artist and Blogger Outreach Programs.
Thank you DecoArt for the opportunity to use your products!
You can visit my DecoArt Profile

I hope you have enjoyed watching me paint 

WINTER TIME MAGIC!

Happy Painting!
Lynn

"Each day is a new canvas to paint upon. Make sure your picture is full of life and happiness, and at the end of the day you don't look at it and wish you had painted something different." ~Author Unknown


Related Posts Plugin for WordPress, Blogger...