Tuesday, December 9, 2014

It is THYME to show you Santa's MAGIC key

Have you ever wondered what would happen
if
SANTA
could not fit down the chimney
or 
worse what if you didn't have a chimney 
for 
SANTA 
 to slide down?

Well....
You would of course have to leave a
 KEY
for 
SANTA
to get in!


Let's head into the STUDIO and paint one!


My pallette for this project


Antique White, Dark Chocolate, Fleshtone, Dark Flesh, Red Iron Oxide,  Avacado, Lamp Black, Slate Grey, Snow White, Napa Red, Burnt Orange, Light Avacado, Antique Gold, Honey Brown, Light Cinnamon

Additional Supplies
Americana Multi Purpose Sealer, DecoArt Glamour Dust Ice Crystal, 
Americana Dura Clear Matte Varnish


I used a 
Pam Grady
design to complete this project

The surface and pattern can be found
at

I first sanded, then sealed my surface with Americana Multi Purpose Sealer
I then base coated with Lamp Black


I then used 
WHITE graphite paper 
to
 transfer the line drawing to my surface


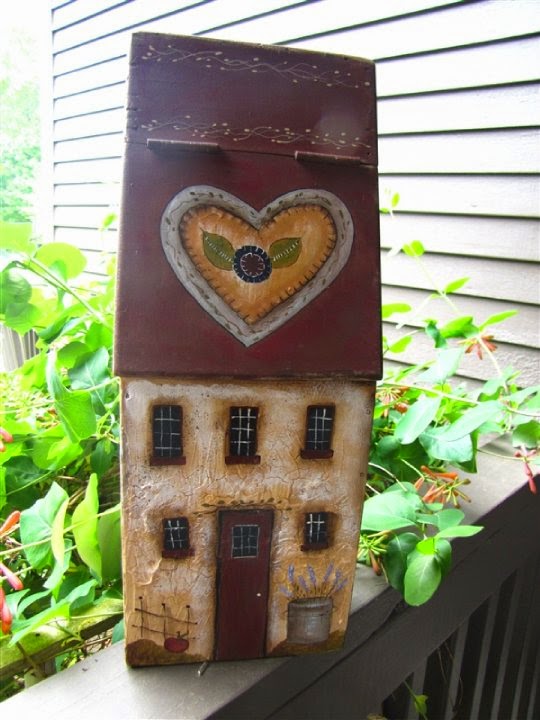
These are good size wood surfaces measuring about 8 1/2" long

There is a lot of detail in this ornament!
Rather than just "scumbling" the FUR on the coat 
I painted it to LOOK like fur


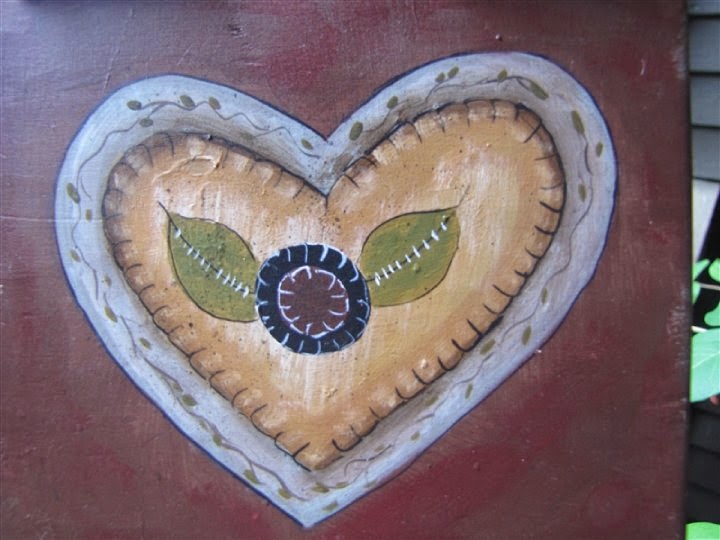
Adding the vine , berries and other details


I used 
to 
add some sparkle to the fur


I used a WHITE chalk pencil
to
write
SANTA'S MAGIC KEY
on the back
I used a small wood snowflake to "dot" the I in the word
MAGIC
I varnished my piece
with
Americana Dura Clear Matte Varnish


I attached a rusty key
and
tied it with homespun


DecoArt provided me with the paints to complete this project as part of their
Helping Artist
and
Blogger Outreach Programs
Thank you DecoArt for the opportunity to work with your products!

You can view my
Deco Art Blogger Profile

HERE

I hope you have enjoyed watching me paint

SANTA'S MAGIC KEY


Happy Painting!
Lynn


"Each day is a new canvas to paint upon.
Make sure your picture is full of life and happiness,
and
at the end of the day you don't look at it
and
wish you had painted something different."
 ~Author Unknown


Sunday, December 7, 2014

Paint with the angels this Christmas Terrye French

In 
May 
Terrye French's 
family
 announced 
that she had suffered 
massive stroke.
It sent a wave of shock through the painting community.
 Terrye 
was 
well known for her primitive, whimsical style.

Prayers were said all around the world for Terrye's recovery 
but 
sadly that was not meant to be
Terrye 
went home to
 HEAVEN 
on 
Thanksgiving Day

11/27/ 2014


Terrye was one of my earliest painting inspirations. 
I have 100's of her patterns 
and 
all the books she ever wrote. 

Several years ago Terrye 
started 

PAINTING WITH FRIENDS

Terrye was one of the most talented, creative, and giving persons that I have ever known
Her dream was to give other painters a chance to get their names out there by getting a chance to "paint with her." 
Terrye would send out line drawings to be painted and made into e-patterns.
 She encouraged you to add your own style to the designs.  
I was beyond honored when Terrye contacted me to be a part of 
from 
the very beginning.

To date I have about 18 PWF patterns published 
with 
several more to complete.

I never got the chance to meet Terrye
but I considered her a dear friend
 I will miss my chats with Terrye via e-mail 
and 
her face book page.


I am blessed to have 2 wonderful pieces in my home that were painted by Terrye.
They are even more treasured now.


This piece is called Strawberry Moon.
It was painted on an old pull toy


This is a wonderful piece that 
Terrye 
painted on an old mail box


Close up detail 


The painting community wanted to do something to keep Terrye's memory alive
she touched so many people with her magic brushes.


Terrye had a beautiful primitive tree that she loved to decorate.
Her family has suggested that it would be a wonderful tribute to Terrye to help decorate the tree for her grandaughters with hand painted ornaments.


Below is a note from Terrye's daughter


Note from Terrye's daughter Kera:
Thank you all so much for the love, prayers and messages you have taken the time to send. It is beautiful beyond words to know all of the lives Mom touched trough painting and her kind heart. Many have asked what they could do during this time. Mom had a primitive country Christmas tree, that she loved. We would be honored if you would help decorate it. If you would like to send an ornament for the tree that would be lovely. Please sign, date and put where you are from on the ornament. We plan to put up the tree every year on Thanksgiving Day. We will be able to share the giving, inspirational, helpful and loving way she touched each one of you with her grand daughters as they get older. This is a beautiful tribute to a beautiful lady. Thank you so much for your love. You are a comfort to our hearts and for you all, we are thankful.

Ornaments can be mailed to:

Terrye French Memorial Tree 
C/O Kristin, Kera, & Klayton
1247 Wandering Oaks Ct.  Norman, OK 73026


I have completed my ornament


Santa's MAGIC Key

design by Pam Grady


Paint with the ANGELS now 

SWEET Terrye

I shall miss you dearly.

Lynn


"Each day is a new canvas to paint upon.
Make sure your picture is full of life and happiness,
and
at the end of the day you don't look at it
and
wish you had painted something different."
 ~Author Unknown

Tuesday, November 25, 2014

Are you "GEARING UP " FOR CHRISTMAS?


The 
MAGIC 
of
CHRISTMAS 
is 
beginning to happen in
 my
STUDIO


Step inside and see!


Today I want to show you a design
by
Cynthia Erekson
that I have completed 
called 
Paint Nick
This is one of two Santa's that are in her new
pattern packet 
called
"Gearing Up" for Christmas
part of her 
Reflections of the Past
series


My Pallette for this design 
was

Antique Gold, Antique Rose, Antique Teal, Arbor Green, Bleached Sand, Buttermilk, Camel, Cherry Red, Dusty Rose, Heritage Brick, Lamp Black , Milk Chocolate, Red Iron Oxide, Sea Glass, Shading Flesh, Snow White,Yellow Ochre

Other supplies:
Dazzling Metallic Emperor's Gold, Deco Art Acrylic GESSO , Americana MATTE Spray Acrylic Sealer/ Finisher, Americana Dura Clear Matte Varnish


This piece was painted 
on
canvas


I prepared my surface by basecoating it 
with 2 SMOOTH coats of 


I let that dry thoroughly between coats.
When dry I sanded lightly and wiped with a damp paper towel 
to remove any dust


My surface is prepared! Now for the FUN part!
Let's paint!

I base coated my surface with Arbor Green then heavily spattered it with 
Sea Glass
to 
give Santa's coat
 a 
"wool " look.


I then used graphite paper to transfer the main pattern lines


The "Paint Nick" kit 
came with all the embellishments
 to 
complete this project


Working on Santa's face
It is always fun to see a piece come to life!


I love this Santa's gentle face!


Working on the tiny pallette and brush embellisments


Adding detail
 to 
Santa's coat and hat
The backside of this surface is painted 
with 
Dazzling Metallic Emperor's Gold


I sprayed my Santa with several 
It is always best to spray 
OVER 
your piece 
and 
let the mist fall on it 
rather than spray ON your piece!

I used 
Americana Dura Clear Matte Varnish 
on the small embellishments


Use a good strong glue such as
 Arlene's Thick Designer Tacky Glue 
in a jar
or 
Quick Dry Tacky
to glue your Santa together.
I used elastics to hold it together as the glue dried
I left it over night
so I was sure that it had completely dried


Adding the remaining embellishments


 Close-up of face detail

Paint Nick 
is
now ready to hang on the tree!


I hope you have enjoyed watching me paint this piece!


DecoArt provided me with the paints and supplies to complete this project as part of their
Blogger Outreach and Helping Artist Programs
Thank you DecoArt for the opportunity to work with your wonderful products!

You can read my Deco Art Blogger Profile

HERE

Keep those brushes flying!
Happy Painting!
Lynn

"Each day is a new canvas to paint upon.
Make sure your picture is full of life and happiness,
and
at the end of the day you don't look at it
and
wish you had painted something different."
 ~Author Unknown

Wednesday, November 19, 2014

Thyme for Rollin' The Cookies


Today 
I would like to show you how I painted 
Prudy Vannier CDA
design
 called
Rollin' The Cookies


You can find the surface for this pattern at 
Tolemine 

My palette for this project is:

Black Plum , Black Green, Burnt Umber , Buttermilk, Cadium Yellow, Camel, Delanes Cheek Color, Driftwood, Grey Sky, Hauser Light Green, Holly Green, Honey Brown, Lamp Black, Light Buttermilk, Medium Flesh, Milk Chocolate, Neutral Grey, Terra Cotta, Titanium White, True Red, Hot Shots Fiery Red

Other Supplies

Deco Art Glamour Dust Ice Crystal, Deco Art Americana  Dura Clear MATTE Varnish, DecoArt Americana Oak/Chene Gel Stain, Americana MATTE Acrylic Sealer / Finisher 


Basecoat the surface
I sometimes also use a small roller for this


Use your graphite paper to transfer design


Let's start to basecoat the design


When painting RED areas such as the ELVES coats
I always paint a coat of either GREY or GREEN FIRST
then I paint my RED


Painting the crock
 I stippled this area to add some texture


Shading the dough


I added
Glamour Dust ( Ice Crystal ) 
to the dough to make it 
sPaRkLe


I just LOVE Prudy's Elves!


This is a
 FUN
 piece to paint!


I am now starting to paint the second surface to this design. 
It is base coated 
in 
True Red


Adding some more
 details and shading
 to the 
main design


I used 
cookie cutters
 to
 trace the designs 
for 
the cookies


Let's add some icing to the cookies!


When my painting was completely dry
I varnished with several coats 
of


Thyme 
to
 paint the frame!
 I painted the frame
 with 
Honey Brown
and 
antiqued 
with 

I let the gel stain dry 
COMPLETELY
before applying
 2 LIGHT coats 
of
Americana MATTE Acrylic Sealer/Finisher 
to the frame


Close up 
of the
Elves


Finished piece!


Thank you Prudy Vannier
for 
such a wonderful design to paint!

DecoArt
provided me with the supplies to complete this project as part 
of their  
Blogger Outreach Program

You can view 
my 
Deco Art Blogger Profile 
and 
many other talented 
DecoArt Bloggers

Thank you DecoArt
 for giving me the opportunity
 to
work with all your fabulous products!


Happy Painting!
 Lynn

"Each day is a new canvas to paint upon.
Make sure your picture is full of life and happiness,
and
at the end of the day you don't look at it
and
wish you had painted something different."
 ~Author Unknown


Related Posts Plugin for WordPress, Blogger...